OPENING QUESTION: Work with your group to develop a plan for making the body of your rocket.
LEARNING GOAL FOR TODAY:
I will inspect/troubleshoot my rocket engine during today's class
WORDS O' THE DAY:
Force ("A push or a pull")
Newton's 3rd Law: Forces always come in pairs
Noun(1) - Verb - Noun(2)
Noun(2) - Verb - Noun (1)
For example:
Hand push desk
Desk push hand
Bath push ball
Ball push bat
═══════════════════════════
Here's some help from https://themodelrocket.com/how-to-diagnose-a-model-rocket-engine-that-wont-ignite/
-
Cut through the tape that is separating the igniters but does not remove the tape.
-
Separate a plug from the strip of plugs.
-
Put the igniter into the engine. The igniter needs to touch the propellant. Make sure you don’t bend the igniter.
-
Put your plug into the engine nozzle (keep the wires straight).
-
Firmly push the plug into the engine
-
Bend the igniter wires back and form the leads into a U shape. Make sure you hold down the plugs with your thumb as you bend the wires.
-
Examine your micro-clips to make sure they’re clean. Attach your micro-clips to the igniter wire leads and arrange the clips, so they aren’t touching each other, the metal blast reflector, or the launch pad.
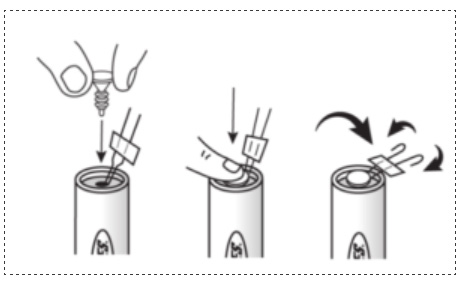
Here's help from the rocket manufacturer:
How do I properly install my starter in my Estes model rocket engine?
1. Hold your Estes engine upside down (as shown).
2. Insert the starter into the engine’s nozzle. The tip of the starter will be resting against the engine’s propellant. It’s important that the tip stays in contact with the propellant for initiation.
a. Do NOT bend the starter; this could cause the starter tip to pull away from the engine’s propellant.
3. Continue to hold the engine upside down when inserting the engine plug. (The insertion of the plug will bend the starter wires a minimal amount, but it should not pull the starter tip away from the propellant.)
4. Once the plug is holding the starter firmly in place, bend the starter wires away from each other (as shown). It is important that the starter wires do not touch each other—either above or below the tape—to avoid a short circuit.
5. Install the engine into your model rocket according to your model rocket’s instructions.